Queensland > South Queensland > Canungra
Beechmont - Rosin's Lookout
| Type | |
| Conditions | SSE-NE |
| Height | 1738ft/530m ASL |
| Rating | HG Supervised / PG2 |


Sealed road to the site from Canungra along Beechmont Rd. Launch adjacent to Rosins Lookout (Refidex Gold Coast Map 45, K20).
Landowners - ?
Contact/Responsible
CHGCSee also
Description
The site is only to be used by CHGC pilots or visiting pilots in the company of a CHGC member.
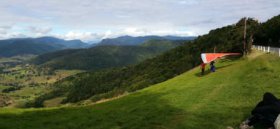
Beechmont Launch, known as Rosin's Lookout, over-looks the stunning Numinbah Valley. The area has remained largely undeveloped in recent decades. To the east is the Springbrook plateau. On the eastern side of the valley is the Natural Bridge in Springbrook National Park and to the west lies the Lamington Plateau and the Lamington National Park. To the south is the Tweed Valley.
The Launch is adjacent to a peaceful picnic area, with dedicated electric BBQ facilities, toilets and undercover seating area. Open to all pilots, as well as the public, it is often an area families come to enjoy a picnic while watching the hang gliders and paragliders fly above them.
Beechmont is of the friendlier sites, in that it is suitable for novices to ridge soar safely with a clear view of the bottom landing area. It has three top landing areas (one dedicated to emergency landings only), and is often the site that pilots will have their first XC flight from. Taking Easterly wind directions, once high enough, you can head towards the west for tens and even hundreds of kilometers.
It is a popular site, and there are times when the sky is very busy, yet times when you may have the whole sky to yourself. Even though located on a public road, it is not as busy with spectators as the Tamborine Launch.
Takeoff
Access to Launch
Beechmont Launch is easy to get to. There is a sealed road to the site from Canungra along Beechmont Rd, this is a public road. The launch area is adjacent to Rosin's Lookout. The site is open to club members and visiting pilots. It's a great prime spectator spot with friendly facilities, but please park in the designated areas.

Driving from Launch to Bombout
Drive down the hill on Beechmont Road towards Nerang (with your back to Launch area, turn right), until you get to the bottom of the hill. Turn right at the intersection on to the Nerang - Murwillumbah Rd. Turn right, on to Pocket Rd. Drive till you reach the Bombout area on the right. All together about 35-45 minutes to get down by car.

Pocket Road Zoomed In
Below is a close up map of Pocket Rd.

Walking Up
It is possible to walk up the mountain from the Bombout to the Launch area, but you have to cross private land, which is heavily frowned upon. This is not recommended, and is to be avoided. It is best not to attempt this walk up until you have been briefed by someone who has already done this. It is easy to get lost. Some of the route is marked by red ribbon. Will take anything between 45min and 1.5hrs. There is a GPS track of this route that can be downloaded from the Downloads page the CHGC website.
Walk up the far side (west side) of the spur until you encounter the track then follow it. There is one tricky spot halfway up where there is a sort of crossroads in a grassy area and the correct path is not apparent in the grass. The correct route is straight up, after 20 metres this track becomes visible again. At the crossroads the obvious track leading to the right is the wrong way. If you get lost backtrack, it is not worth trying to forge through lantana. Very muddy after rain. Note, you won't actually come out back at the Launch area, but on to the Beechmont Rd a few hundred metres away.
Landing
There is one main dedicated Bombout at Beechmont, but with additional acceptable landing areas adjacent to the Bombout. One being the "Pizza Paddock" (a triangular patch) and Prison Farm on the other side of the Southern ridge. There is a definite no landing area (marked in red below), please avoid this area at all times.
Pilots can also land at the bottom of the Southern ridge and walk up the mountain to Launch but not back down towards the Bombout (see Downloads page of this website to download the GPS track to walk up).
There are numerous landing areas at the top, including the "Top Landing" area directly behind launch (on the other side of the road), "the school" which is infact a paddock on the other side of the school community hall, the "new estate" area and Munsters which can be used in an emergency. All these areas are drawn and labelled in the Online Maps page of this website.
Main Bombout Aerial View
Main bombout straight out from launch dissected by a fence running east-west. Upslope landing from SE-NE. Note power lines to the north of the Bombout paddock.

Main Bombout (click image to enlarge)

Face Landing
Face landings intermediate and above. Restricted Pilots only under supervision of Instructor or Club Safety Officer, as serious injuries have occurred.

Flight
CTA: above 6500ft.
Hazards / Comments
If landing in the bombout paddock in the valley, be aware that there is an up-slope landing from SE-NE.
First-Aid kit in the main bombout in the valley. It is located under near the road, under the stile.
There is a sea breeze influence most afternoons in Spring and Summer. This can be great to soar but be aware that it can come roaring in.
In northerly winds, the windsock may indicate a more easterly airflow, as if coming up the face of launch. Check the wind station for a more accurate reading.
In southerly winds, potential for rotor on northern side of the southern ridge.
Be aware of valley wind effect in bombout when coming into land. Can be quite north or even NW.
Be aware of power line north of launch running down into the valley.
Be aware of power line to the north of the bombout paddock.
In southerly winds, be aware of your glide back to the bombout, if in the northern bowl. Perform little passes back towards launch to ascertain the strength of the wind, before venturing further towards the northern bowl.
There is commonly a wind gradient on landing, which can be severe in the last 50 feet.
If going XC from Beechmont, in moderate winds there is no safe landing until Hinchcliffe bombout,
The "Postage Stamp" located half way up from the valley, is an acceptable landing area for those who wish to walk back up. It is often overgrown and really only suitable for skilled intermediate and advanced pilots.
The Prison Farm land on the southern side of the spur is a more suitable landing area for those pilots wishing to land short and walk back up. However, do not land there with the intention of walking down to the bombout.
The Model Airfield is a suitable alternative landing area in southerly winds when pilots struggle low at the northern end of Beechmont ridge. Instead of trying to reach the official bombout, pilots can just fly easterly down the spur and land there.
Munsters is an emergency landing area on the top that can be used in southerly winds only. Dangerous in E and NE winds because of rotor from hills on the E and NE side. There is a fence at Munsters dividing the paddock in two (running E-W), and there's a power pole near the gate.
Face landings on Launch is for intermediate and experienced pilots only. Restricted Pilots can only face land under supervision of Instructor or Senior Safety Officer. It may be tempting, so as not to bombout, but serious injuries have occurred.
All face landings for all pilots are to be in the vicinity of the marker cone. No landing in the setup area.
Launching Area
If it is windy, pilots must launch from in front of the trees. There is to be no ground handling anywhere near the set up area. It must be done further down the slope or in front of the trees on windy days.
Face-landing
Face-landing is only permitted for Intermediate and Advanced SAFA rated pilots only. If you are new to Beechmont, seek advice first on face-landing as some pilots have had serious injuries attempting to do so.
A cone has been placed on Launch 25 metres from the road. This is the preferred zone for pilots wishing to face-land. Pilots must make a conscious effort to land in that area. That is below the trees bordering the launch and south of the windsock.
Any pilot that puts their wing on the road is putting themselves and the public at grave risk. If this occurs, then it must be reported to a SSO within 24 hours or you will have to pay a $50 fine. You may use the Report an Incident form on this website to contact a SSO. This also applies for Tandem pilots. The preferred landing area for tandems is in the vicinity of the cone.
Landings in the Setup Area.
There is to be no landings in the set up area. Pilots who do so are completely responsible for their actions and the committee will fully cooperate with any authority investigating pilots who break SAFA regulations. For those new to flying Beechmont, you need to be aware that even the smallest change in wind direction can make the world of difference to whether you can make any particular landing area.
Flying in Southerly Winds
Southerly winds on Beechmont are probably the worst in regards to getting to a landing area. Even though Beechmont is quite soarable when the wind is SSE, you won't get as high compared to wind of the same strength but coming from the E or NE. The reason for this is that when the wind comes from the SSE it runs along the ridge rather than up it, and there is nothing at the end of the ridge to turn the wind up the face.
When the wind comes from the NE, it gets pushed up the bowl to the right of launch and makes the hill much more soarable. Making the bomobout when the wind is from the NE is easiest done by soaring the bowl to the right of launch and then heading out to the B/O from the spur. But if the wind is from the south, the bowl is not going to produce any lift at all and if the wind is quite south, you may well be flying into rotor if heading out via the bowl.
If you are trying to make the B/O from launch in a Southerly wind, the best is to head directly out from launch. And if you are any lower than launch height, you probably won't make it. Remember that when you leave the ridge in a southerly, you'll be pushing a headwind all the way to the B/O. The land owners at the bottom of Beechmont don't want pilots landing short around their houses so make sure you leave ample height to get to the bombout. Don't wait till you are half the height of the hill to head out. For top landing in a South wind, be aware that if you are trying to fly to the school, it will be cross wind from launch, and if the wind is really south, then the school is almost headwind.;
You need a LOT more height to get to any top landing area in a southerly than in a NE when the landing areas are basically downwind. There are times when Munsters is almost impossible to get to in a Southerly even if you are 150m above launch. If you can't guarantee that you have enough height to easily make the approved top landing area, then you MUST go to the bombout.
Map information
